
Florida Help
This section describes the Feed program for existing users.
Figure 1: Displays the Feed Program screen.
Click Update
Registrant Contact Info link
on the left hand side of the screen.
It displays the Renewal Feed Master Registration screen as shown in Figure 2.
Figure 2: Displays the Feed Master Registration screen for renewal.

All the fields marked " * " are mandatory fields.
Registrant Information Details:
Enter all the detailed information of the dealer as shown in Figure 2.
The
Registrant # field displays the
Registrant number.
The
Company Name field displays name
of the
Company applying for Florida Feed Master Registration.
Enter
the Physical location in which
the manufacturer or distributor is located in the Physical
Address text field.
Select
the Country in
which the manufacturer or distributor is located from the Country
Picklist.
Select
the State in which the manufacturer
or distributor is located from the State
Picklist.
Enter
the name of the City in which
the manufacturer
or distributor is located in the City
text field.
Enter
the Zip code in which the manufacturer
or distributor is located in the Postal Code text field.
Enter
the Website address of the company in the Web
site text field.
Contact Information Details:
Select
the Contact Type from
the list box. Authorized Representative:-
The initial manufacturer/distributor contact for registration, tonnage,
and compliance issues. This
individual will be the primary department contact, unless other contacts
are designated following application approval.
Select the Title from the drop down list.
Enter
the contact's First name in the First
Name text field.
Enter
the contact's Last name in
the Last Name text field.
Enter
the contact’s Mailing address in the
Address text field.
Select
the contact’s mailing address Country
from the Picklist
Enter
the contact’s mailing address State from
the Picklist.
Enter
the contact’s mailing address City in
the City text field
Enter
the contact’s mailing address Zip code
in the Postal Code text
field.
Enter
the contact’s Area
Code and Contact’s number in Phone text field.
Enter
the contact's Alternative contact number
in the
Alt Phone text field.
Enter
the contact's Fax number in the
Fax text field.
Enter
the contact's Email address in the
Email text field. Future correspondence
regarding registration, tonnage reporting, and sampling/analysis compliance
will be conducted via email.
Enter
the contact's Alternative Email address
in Alt Email text field.
Click
the Save Contact link to save
the contact information.
The
current contact record is displayed below.
To
add an
additional contact, click the Add Another
Contact link.
To
delete the contact information, click the Clear
Contact link.
Click
the Continue Renewal button.
It
displays the Fee schedule list
and the Tons distributed as
shown in Figure 3.
Figure 3: Displays the Fee Schedule screen.
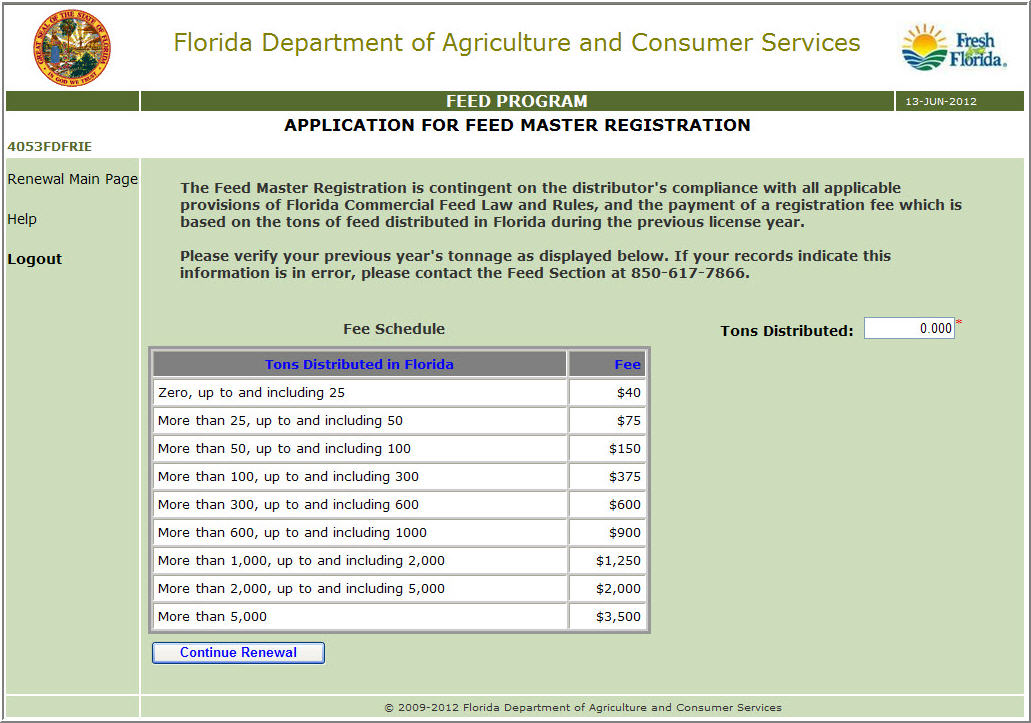
The Fee Schedule table lists the ranges of feed distribution amounts in tons and the corresponding registration fee amounts.
The Tons distributed represents the total Feed tonnage distributed by the company during the previous fiscal year (July 1 – June 30). This information is obtained from the Quarterly Reports of Commercial Feed Distributed in the State of Florida previously submitted by your company.
Click the Continue
Renewal button as shown in Figure
3.
It displays the Renewed Feed Master Registration Summary screen as shown in Figure 4.
Figure 4: Displays the Renew Feed Master Registration Summary screen.

For Submission Of Renewal
The Registration fee is variable based on
the tons of feed distributed in this state during the previous year.
If all information
on the renewal screen is accurate, click SUBMIT
RENEWAL button to proceed the registration process.
Click Modify Renewal Info button for editing any records.
Figure 5: Displays the Updated Feed Master Registration Information screen.

Click the Update Registrant Contact
Info link on the left hand side of the screen as shown in Figure 1.
It displays the Feed
Master Registrant Information screen as shown in Figure
5.
If modifications made to registrant and contact
information are correct, click the SAVE
MODIFICATIONS button.
Click CANCEL
MODIFICATIONS button to cancel any modifications made to registrant
or contact information.
Figure 6: Displays the Quarterly Report of Commercial Feed screen distributed in the State of Florida.

Quarterly Distribution Information:
Click the Report
Quarterly Tonnage link on the left hand side of the screen as shown
in Figure 1.
It displays the Quarterly
Report of Commercial Feed screen distributed in the State of Florida as
shown in Figure 6.
Enter the details in the Report screen.
Select the name of the individual submitting the
report in Submitted By text field.
The Submitted by is the name of the individual
reporting quarterly distribution information for the selected quarters.
Select the appropriate
Reporting Year for reporting the
quarterly distribution information. The
Reporting Year runs concurrently with the registration year (July 1st
through June 30th).
Select the appropriate
Reporting Quarter for reporting
the quarterly distribution information. The
Reporting Quarter represents the specific 3 month period of the reporting
year during which feed was distributed.
Enter the date of submission in Date
Submitted text field. The Date Submitted
is an auto-generated date and time that will be assigned by the system
once the user finishes
entering all tonnage data for the quarter and clicks the “Submit Quarterly Distribution
Info” button at the bottom of the
page.
To view reported quarterly
feed distribution information, click the Tonnage
Summary Info link and select the appropriate
Reporting Year from
the list box.
Enter all the detail information in the Submit Quarterly Distribution Info screen as shown in Figure 6 and click the Submit Quarterly Distribution Info button at the bottom of the page.
Tonnage data may only be submitted once for each quarter. In the event that tonnage values are incorrectly reported and an amended report is required, please contact the Feed Section at (850) 488-7626.
Figure 7: Displays the Summary of Quarterly Feed Distributed in the State of Florida.
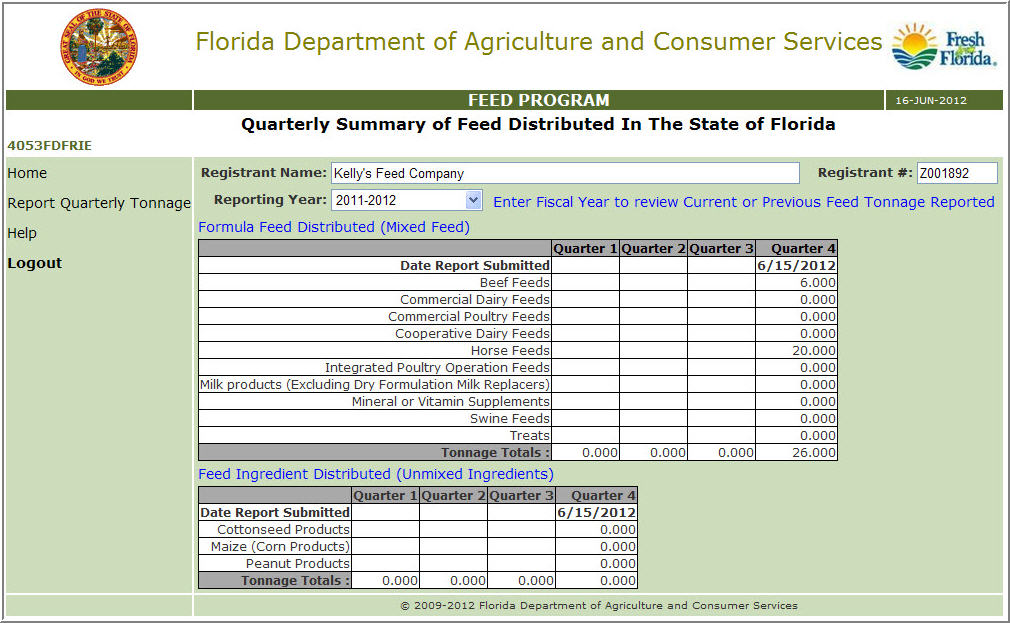
Tonnage Summary Information:
To view reported quarterly feed distribution information,
click the Tonnage Summary Info as
shown in Figure 1
and Figure 6
link on the left hand of the screen and select the appropriate Reporting
Year.
It displays the summary of Quarterly Feed distribution as shown in Figure 7.
Figure 8: Displays the Analytical Report Review and Deficiency Status screen.

Click the Access
Analytical Reports link on the left hand side of the screen as
shown in Figure 1.
It displays the Analytical Report Review and Deficiency Status screen as shown in Figure 8.
Fiscal Year:
Enter the fiscal year (July 1 – June 30) for the samples and associated analytical reports that you wish to review.
View Report:
To view the seed analysis report for a specific sample, click the appropriate sample number (in blue) in the View Report column on the right-hand side of the table.
Total Analyzed Samples:
The Total Analyzed sample represents the total number of feed regulatory samples submitted for protein, fat, and fiber analysis by the company during the previous fiscal year (July 1 – June 30).
Total Deficient Samples:
The Total Deficient sample represents the number of feed regulatory samples submitted for protein, fat, and fiber analysis by the company during the previous fiscal year (July 1 – June 30), that were reported as deficient or excessive.
Deficiency Index:
The Deficiency Index is calculated by dividing the number of samples analyzed and reported as deficient or excessive by the total number of samples analyzed during the previous fiscal year (July 1- June 30), and determines the registrant’s mixed feed nutrient analysis frequency for the following year.
Figure 9: Displays the Feed Sample Compliance Review screen.
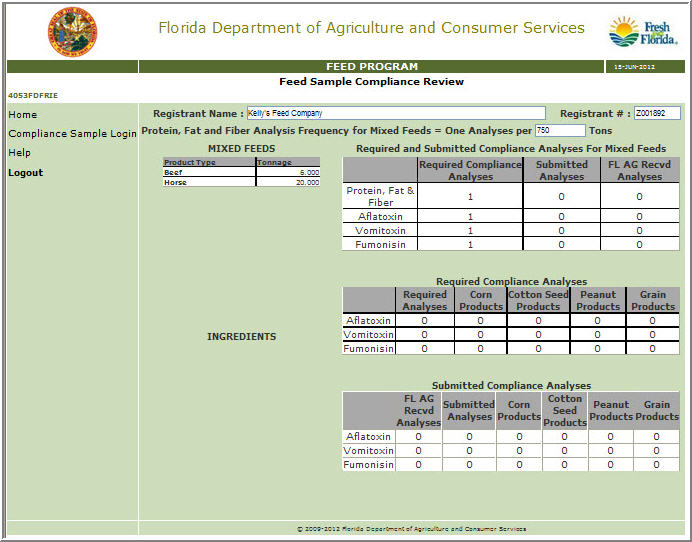
Click the Compliance
Sample Calculator link on the left hand side of the screen as shown
in Figure 1.
It displays the Feed Sample Compliance Review screen as shown in Figure 9.
Protein, Fat, and Fiber Analysis Frequency for Mixed Feeds or Deficiency Index:
The Protein, fat and Fibre analysis frequency is calculated by dividing the number of samples analyzed and reported as deficient or excessive by the total number of samples analyzed during the previous fiscal year (July 1- June 30), and determines the registrant’s mixed feed nutrient analysis frequency for the following year.
If the Feed distributor’s
deficiency rate is 5% or less, the sampling frequency is one sample analysis
for protein, fat, and fiber per every 2000 cumulative tons of mixed feed
(or any fraction thereof).
If the distributor’s deficiency
rate is greater than 5% but less than 10%, the sampling frequency is one
sample analysis for per every 1000 cumulative tons (or any fraction thereof).
If the distributor’s deficiency
rate is 20% or greater, the sampling frequency is one sample analysis
for protein, fat, and fiber per every 500 tons (or any fraction thereof).
Figure 10: Displays the Feed Compliance Sample Login screen.
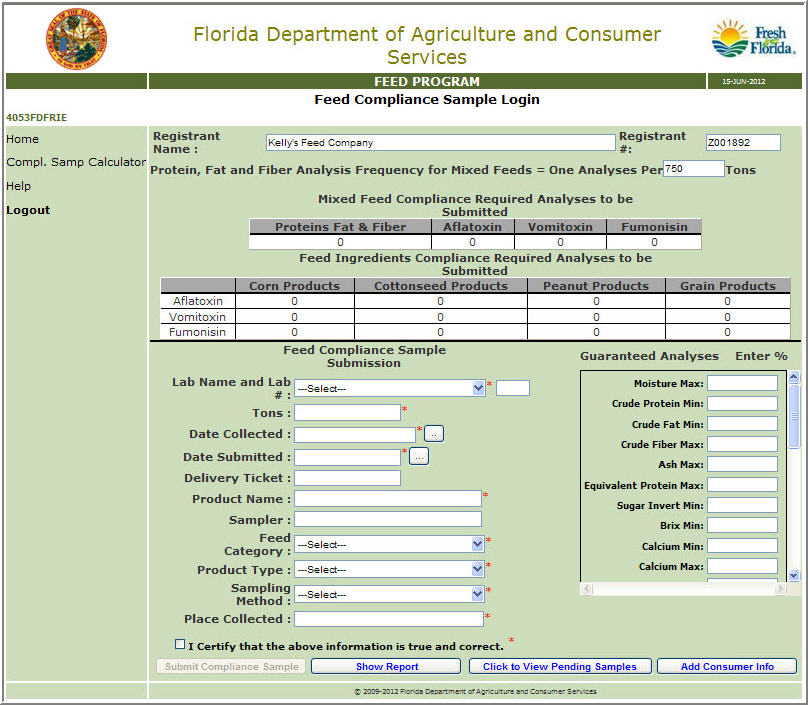
Click the Compliance
Sample Login link on the left hand side of the screen as shown
in Figure 1.
It displays the Feed Compliance Sample Login screen as shown in Figure 9.
Protein, Fat, and Fiber Analysis Frequency for Mixed Feeds or Deficiency Index:
The Protein, Fat, and Fiber Analysis Frequency is calculated by dividing the number of samples analyzed and reported as deficient and/or excessive by the total number of samples analyzed during the previous fiscal year (July 1- June 30), and determines the registrant’s mixed feed nutrient analysis frequency for the following year.
Lab Name and Lab#:
Select a laboratory that is certified to perform the analyses for which you intend to submit samples.
The laboratory name and number represents the list of the laboratories currently certified by the Department to analyze feed regulatory samples. For additional information regarding the certified laboratories, please contact the Feed Laboratory Section at (850) 414-1890.
Sample #:
Click the Submit Compliance Sample button at the bottom of the page.
The Sample # is an auto-generated number that is assigned by the system once the user has finished entering all sample data.
Date Collected:
Enter the Collection Date.
The date collected represents the actual date on which the sample was collected by the sampler, and should be formatted as follows: DD/MM/YYYY?
Date Submitted:
Enter the Date of Submission.
The date collected represents the date on which the sample was submitted to the certified laboratory for analysis, and should be formatted as follows: DD/MM/YYYY?
Delivery Ticket:
Enter the Delivery Ticket number.
This refers to refers to the invoice or delivery ticket number depicting shipment of the product to a secondary distributor or consumer, where applicable.
Product Name:
Enter the Product Name.
The Product Name represents the brand name of the sampled product (i.e. “ABC Super Swine Finisher”)
Product Type:
Select the Product Type from the Picklist.
The Product Type refers to the specific category under which the product is reported on the “Submit Quarterly Distribution Info” page (i.e. Mixed Feed Types: Beef Feeds, Commercial Dairy Feeds, Cooperative Dairy Feeds, Horse Feeds, Commercial Poultry Feeds, Integrated Poultry Operation Feeds, Swine Feeds, Mineral or Vitamin Supplements, Milk Products, Treats, Other Feeds, and Feed Ingredient Types: Corn Products, Cottonseed Products, Peanut Products, Soybean Products, Grain or Grain Products, Animal Products, Mineral Products, Other Feed Ingredients)
Sampler:
Select the appropriate name from the available registrant contacts.
The name of the individual who is submitting the regulatory sample to the certified laboratory for analysis.
Sampling Method:
The sampling method refers to how the sample was collected, possible choices include “Hand”, “Probe”, “Other” (i.e. sent entire unopened container), etc.
Place Collected:
The place collected refers to the specific location where the sample was collected (i.e. Warehouse, Storage Bin, Production Line, Elevator, etc.)
On the Feed Collection/Analysis
Guaranteed Analysis:
Select the analyses you are requesting on the sample and enter the associated guarantees from the sampled product label.
For mycotoxin analyses, do not enter values in the guarantee column; a default value of “non-detect” will be assigned for these analyses.
Submit a copy or photograph of the actual product label to the certified laboratory along with the sample.
Submit Compliance Sample:
Once all information on the “Feed Compliance Sample Login” page has been entered and reviewed for accuracy, click Submit Compliance Sample button at the bottom of the page.
Click the Download Result EDD File button to download the EDD file. It displays the Feed Compliance Download Submitted Samples screen as shown in Figure 11.
Figure 11: Displays the Feed Compliance Download Submitted Samples screen.
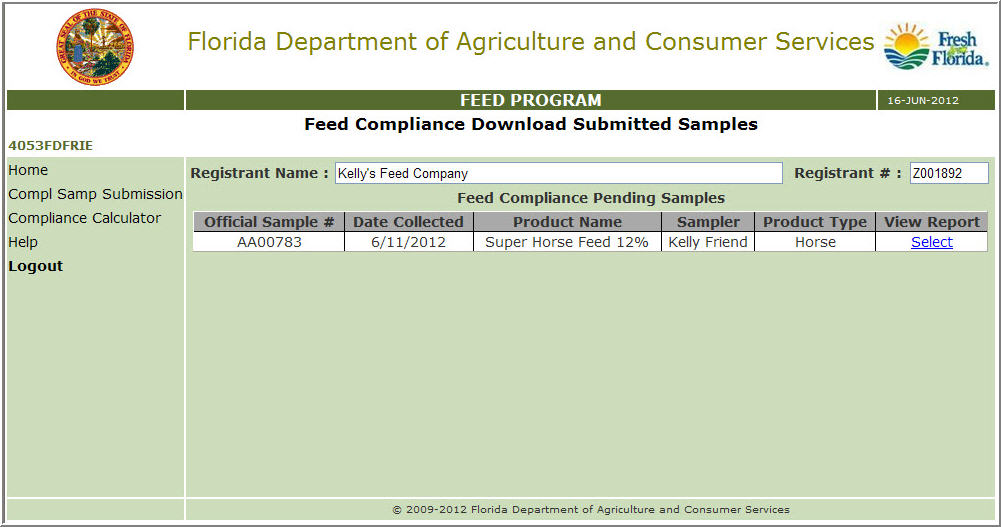
Click the Save Feed Result Sample/Result Submission File button to save the record.